.png)
ALMS - Basic Student User Manual (English)
PDF of the Manual: ALMS - Basic Student User Manual.pdf
I. DEFINITION OF LEARNING MANAGEMENT SYSTEM (LMS)
Consists of the initials of Learning Management System, which is Learning Management System in Turkish. In general terms, it can be defined as software that is created to manage e-learning processes more efficiently and effectively and enables the distance education model to be implemented on the internet.
1. With LMS?
LMSs, as learning management systems, provide training management, reporting, performance tracking, automation, class – course creation, creating and uploading course materials, giving lessons and homework, creating exams, etc. It meets many needs such as. At the same time, LMSs allow integration with other tools to enhance the learning experience.
During the training period in Istanbul Topkapı University Distance Education System (ALMS), instructors;
Creating and participating in a virtual classroom,
Access and control of live lecture recording videos,
Lesson - adding course materials,
Adding a homework area,
Creating exam or quiz activities,
exam, quiz or homework grades to OIS (Student Information System),
Performance tracking,
Sharing announcements,
Student list checks for each branch,
Exchanging ideas with students, discussing scientific issues, etc. creating forums for activities,
Organizing a survey,
Sharing information notes,
etc. They can actively use many features.
2. ALMS (Distance Education System) System Requirements
ALMS Distance Education System is a cloud-based software and does not require installation. You can access the system via your browser (Google Chrome, Firefox, Microsoft Edge , Safari, etc.) using any computer, tablet or phone.
Note: All browsers accessing the ALMS system although it is recommended to use the Google Chrome browser.
3. The ALMS (Distance Education System) System?
Your Alms system from 2 different web addresses;
ALMS Domain: yourname.almscloud.com
Your Website's Subdomain: alms.yourname.edu.tr
II. INTRODUCTION TO ALMS (DISTANCE EDUCATION SYSTEM) SYSTEM
Your ALMS Distance Education System; Log in to either yourname.almscloud.com or alms.yourname.edu.tr
Username: On the page that opens, enter your student number completely in the username field. Ex: 2211591221
Password: You can log in to the system by entering your OIS (Student Information System) password in the password field and clicking the Start Learning button.
If you think you entered your username incorrectly, you can return to the previous screen and re-enter your username by clicking the up arrow button opposite your name on the login screen.

Note: The Distance Education Center does not create passwords for logging into the ALMS system. Since the OIS (Student Information System) and ALMS (Distance Education System) user logins are integrated, you can log in to the system using your OIS password. If you do not remember your OIS password, you can contact the Student Affairs Office responsible for the system to retrieve your password.
III. ALMS DISTANCE EDUCATION SYSTEM MENUS
1. Home page
When you log in to the Alms Distance Education System, you will see a default standard welcome screen on the Home Page. Fields in the top menu;

1.1. Home
The area where the welcome screen and menus are located.
1.2. My Courses
The area where your defined courses are listed. You can view active courses for the relevant period in the My Courses section, as well as list passive courses from previous periods. To view all the courses, click the Go to My Courses button. Go to My Courses button to view all your courses . Then all your courses will be listed.

1.3. Calendar
By selecting the year, month and day in the calendar, you can view the activities planned on the date you choose. In the activity type section at the bottom left, you can select the activity you want to view on the calendar by deselecting or selecting virtual class, homework, exam, video, forum, e-course and document. You can view the calendar daily, weekly and monthly by clicking on the day, week and month buttons in the middle of the calendar. You can switch to the activity by clicking on the name of the activity you are viewing in the calendar. You can add any documents, assignments, exams, etc. to your course in the system. If you do not add any activities, the calendar section will appear empty.

1.4. Communication Tools
1.4.1. Messages
When you click on the Messages communication tab, other students and teachers in your class are listed in the groups and people you are part of in the groups section on the right side of the page. You can search for a group or a contact and switch to the messaging area by clicking on the group or contact name. On the left of the page, in the all section, you view the latest messages received or sent by group and individual. You can view group messages by clicking on the group button and view personal messages by clicking on the personal button.

When you click on a group or person's name, the messaging section opens in the middle. You can view older messages by swiping up on opened messages. You can write a message by clicking on the section where it says enter message and send your message by clicking on the send button. You can add the format, thickness, italic, underline, strikethrough, quote, bullet, number, item, indent, formula and link features to the text you write. You can clear the formats of a text you added. You can add an emoji or a file to your conversation.
1.4.2. Announcements
You can read the announcements sent to you by clicking on the announcement names in the incoming announcements section.

1.5. Forum
You can have scientific discussions about any subject by opening a discussion with your teachers. You must write your answers and press the send button.

1.6. Help
For your system-related questions, you can open a support request from the help area to the company from which we receive support for the Alms Distance Education System.
Note: For help and support requests related to the ALMS Distance Education System, it is recommended to contact the team at the Distance Education Application and Research Center.
2. MY ALMS COURSES TAB
Alms Distance Education System by logging in to either yourname.almscloud.com or alms. yourname.edu.tr . You can view your active course list on the home page screen or via the My Courses button at the top.
2.1. Sections in the My Courses Tab
After logging into the course, there are some buttons next to the course name.

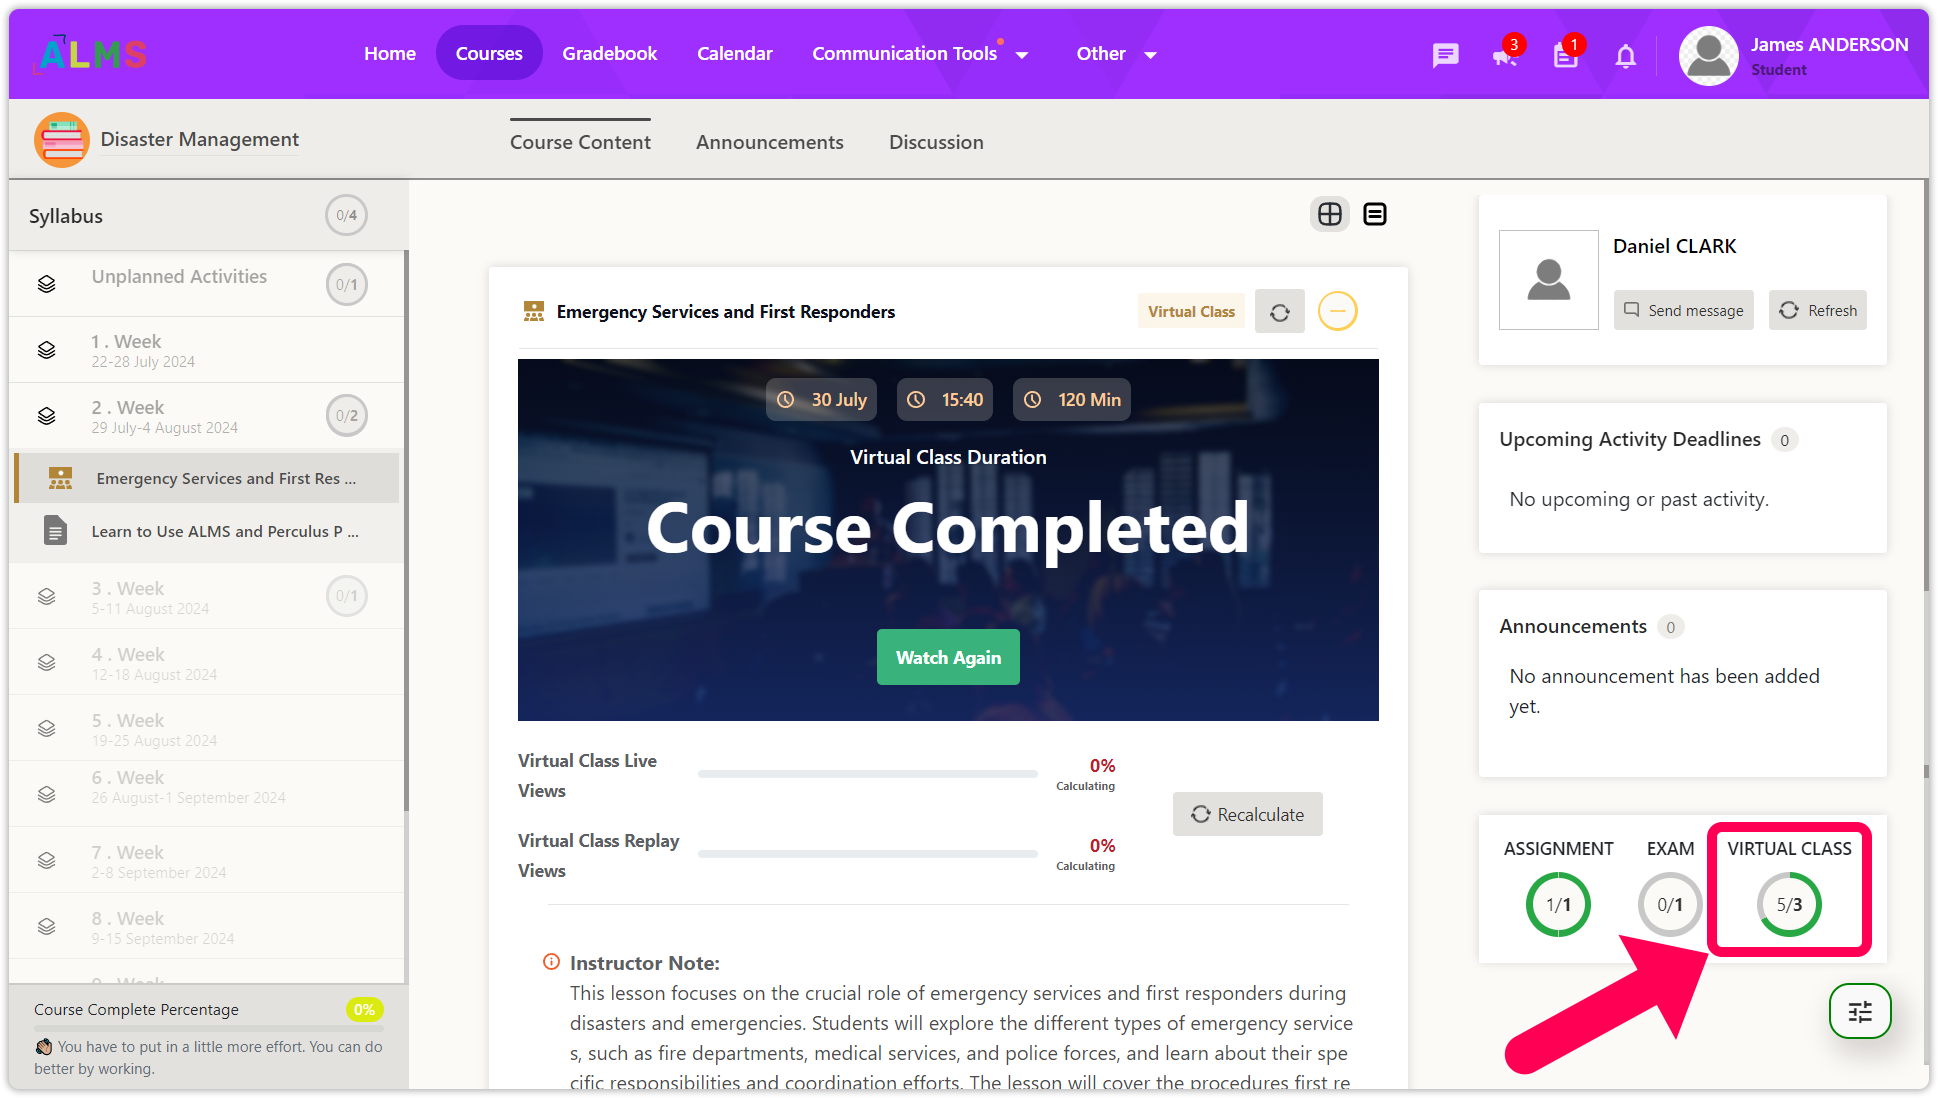
2.1.1. The Course Content
The course content section is the most used area that covers all course activities. Virtual classroom, documents, homework, exams, information notes, etc. All activities are added from the Course Content tab.

2.1.2. The Announcements
The announcements section is the area where announcements can be made to all students or students in certain branches.

2.1.3. The Discussion
The discussion section is a forum-like area used to exchange ideas on any subject.

2.1.4. Homework
Homework indicates the total number of assignments in the course. The number of assignments you have uploaded to your assignment file is also included.

2.1.5. Exams
The total number of exams in the exam course is indicated. It also includes the number of exams you have attended.

2.1.6. Virtual Class
Virtual class is the total number of virtual classes included in the course. Also included is the number of virtual classes you attended live.
IV. LESSONS
Adding documents to the course, creating a virtual classroom, adding a homework area, exam area, etc. The process of adding fields is called creating an activity.
1. Joining Online Lessons and Virtual Classrooms
From the My Lessons menu, we click on the course where your live lesson is located. Then we observe the Virtual classroom activity. When we click on the green button, which is the Join Button, the virtual classroom window will open as a new window.

1.1. Opening a Camera in the Virtual Classroom
In order for you to turn on a camera during class, your instructor must first give you permission to do so. You can understand that you have permission by clicking on the camera icon. There are two ways to open the camera;
First, click on the Camera icon located in the middle of the screen. Then you can choose your camera from the Camera options.


Latter; When you click on the camera icon opposite your name in the Users section, your camera will open.


Additionally, your instructor can turn on your camera, but it is up to you to approve this. Do not click the Yes button to confirm.

1.2. Turning on a Microphone in a Virtual Classroom
In order for you to turn on the microphone during class, your instructor must first give you permission to do so. You can understand that you have permission by clicking on the microphone icon. There are two ways to turn on the microphone;
First, click on the Camera icon located in the middle of the screen. Then your microphone will turn on.


Latter; When you click on the microphone icon opposite your name in the Users section, your microphone will be turned on.


You can understand that both your camera and microphone are turned on by seeing the icons at the bottom and on the right panel.
Additionally, your instructor can turn on your microphone, but it is up to you to confirm this.

1.3. Uploading the Presentation File to the Virtual Classroom
First of all, your instructor will need to authorize you to upload your homework file to the system. When you authorize it, the left panel will become visible.
Step 1: You should open the menu of activities that can be added to the system by clicking on the plus icon.


Step 2: Then, you must select the Upload Document option from the menus that appear.

Step 3: You can select your Presentation file by clicking the blue plus button. After selecting your file, you need to press the Open button.


Step 4: After your file is uploaded to the system, you need to point and click on the file you uploaded, since it is a document that is already used in the virtual classroom.


Afterwards, you will observe that your document is opened in the virtual classroom. You can also test the visibility of your document from the Flow menu. You can understand that there is no play button by the sign that the content is playing.


1.4. Asking for a Speak in the Virtual Classroom
To ask for a say in the virtual classroom, you must press the raise your hand icon located in the middle of the page.
2. Uploading Homework to the System
You can upload your homework files to the system between the homework upload dates given to you by your educator. Assignments are not uploaded to the system after the last assignment upload date, hour or even minute has passed.
Our advice to our students is not to leave uploading your assignments until the last minute. Do not keep your homework uploads waiting until the last 10 minutes before the system closes. It is not recommended to install it beforehand.
Note: Your file upload rights in the system are determined by the permissions granted to you by your instructor. For example, if you are given the right to upload 5 files, you can upload and edit files 5 times. Only one file can be uploaded to the system at a time. To upload multiple files, you should compress them into a .rar file before uploading.
2.1. Document attached to the assignment
The files that educators add to the assignment cannot be seen before the assignment due date begins. However, when the start date comes, the attached file will be visible to you, our valued students. You can download the attached file to your computer by clicking on the file.

2.2. Right to Upload Files
The right to upload files means that you, our valued students, have the right to upload files to the system more than once when changes are made to the assignment. In other words, only 1 homework file is saved in the system. In other words, the last uploaded file in the files that have been modified is the file saved to the system. In other words, more than one file is not saved to the system in this way. To upload multiple files .rar or With .zip, you need to upload your files as compressed files. Since multiple compressed files are considered one file, you will not encounter any problems. In addition, the number of this file upload right is determined by the course instructor.

You exercise your right every time a file is edited and uploaded to the system. For example ; 1/5 means he used his first right. If it is 2/5, it means that you have used the second right out of the five rights given to the instructor and uploaded the file to the system twice.

2.3. Homework Grade
Your instructor will enter your homework grade into the system. If your grade has not been entered yet, you can see it as -1.
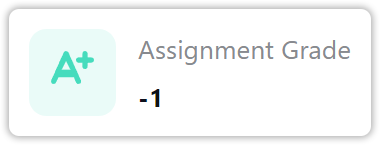
You can only see your assignment grade when your instructor enters your grade. Sometimes our instructors enter grades directly into the OİS system. If you cannot see your grade in the ALMS system, do not worry. You can send an e-mail to your instructor about the subject.

2.4. Start Time and End Time
Start Time and End Time are the time when the assignment upload area is opened and remains open by our instructors. Our students may not upload their homework during these dates. If you try to load it 1 minute later or 1 minute earlier, you will fail. We recommend that you complete all your transactions 10 minutes before the system shuts down.

2.5. Steps to Submit Assignment
When you complete the steps below, your homework will be uploaded to the system. For this, we recommend that you make sure that your internet connection is good beforehand.
Step 1: Go to the Homework activity and click the Send Assignment button.

Step 2: You must select the file you will upload by clicking Select in the window that opens.

Step 3: After making sure that the file you selected is correct, you should click the Open button.

Step 4: If the file you selected is correct, the Upload 1 File button should be clicked to upload your assignment to the system.


Step 5: Even if the upload is completed, your assignment will not be saved until you click the Save button. In order for your homework to be saved in the system, you must click the Save button below on the right.

Step 6: When you upload the assignment, you will see that you have used 1/5 of your first upload space. Additionally, your homework file will be included in the file uploaded to the system. We recommend you check back here.

You will receive a notification as above that the file has been uploaded by the system.
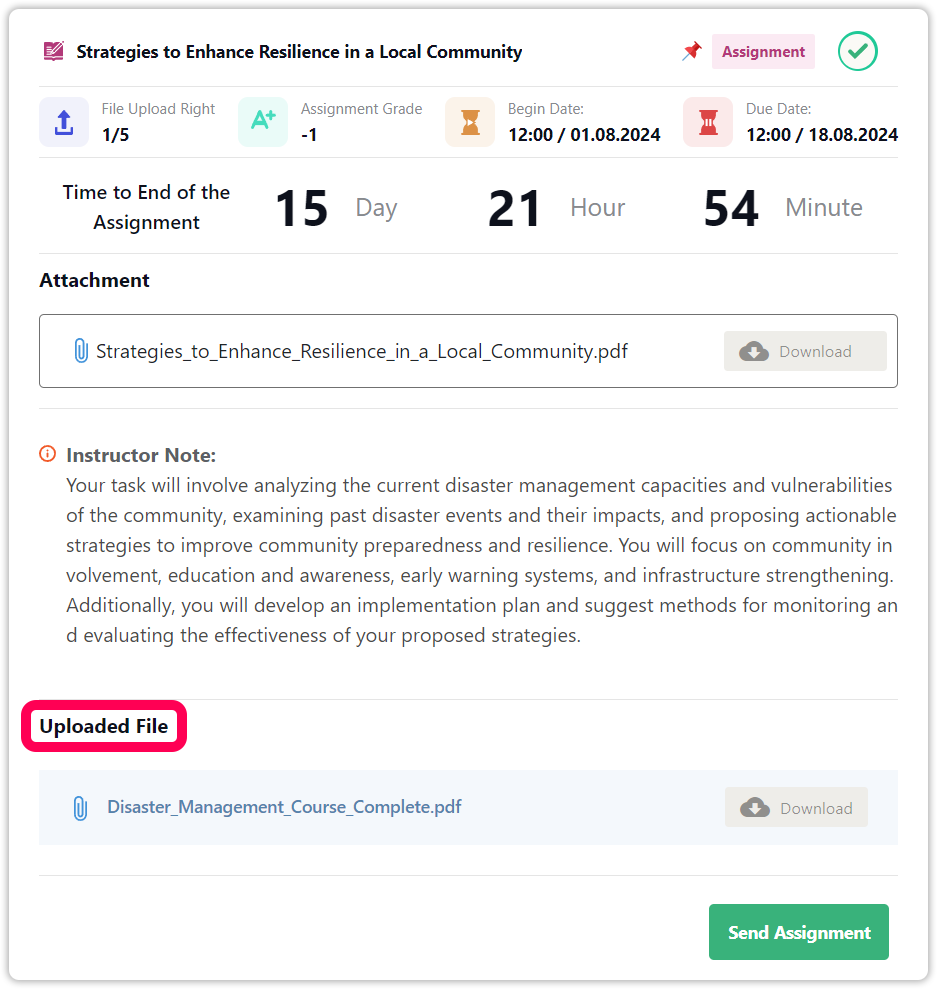
Note: Your assignment file can be in any format such as pdf, docx, .zip, .sav, etc. However, the size of your file is limited to a maximum of 1 GB.
3. Participating in the Online Exam
We recommend that you make sure that you have good internet connection before taking the online exam. We also recommend that you use the Chrome browser and disable any Chrome extensions you have. You are kindly requested to take these precautions to avoid making any mistakes during the exam.
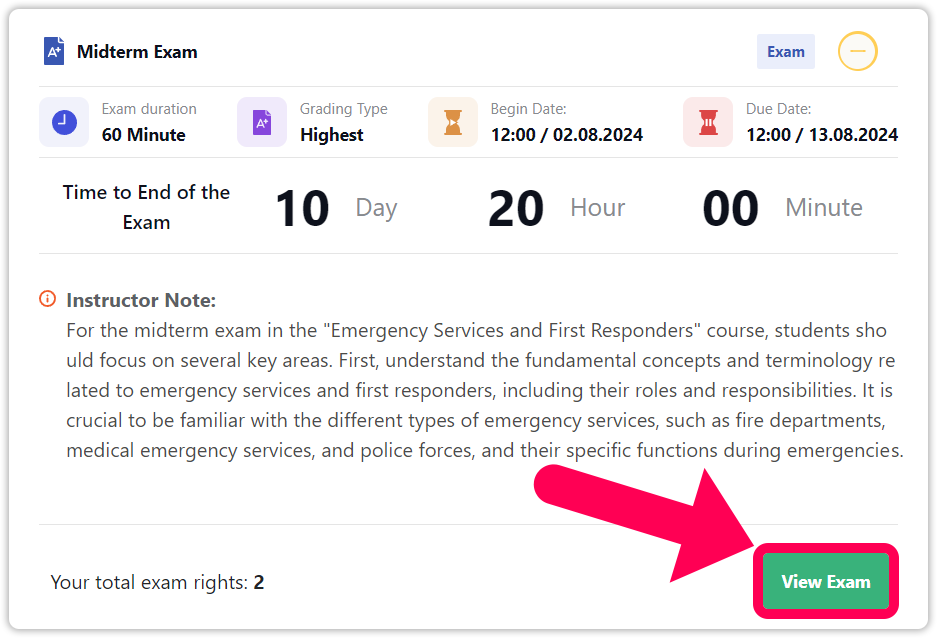
3.1. Exam Duration
Exam time is the time your instructors give you to use during the exam. For example, your instructor may have given you 20 minutes or 30 minutes for an exam with 10 questions. This is a number given depending on the speed of solving the questions as a result of measurement and evaluation. Our educators determine this period.

3.2. Grading Type
Considering that there may be problems in exams for which the exam right is granted and in the exams of students who have used their exam right more than once, the highest grade is recorded. After the exam is over and the exam grades are entered, the student's grade is seen.

3.3. Start Time and End Time
This is the feature that tells you when the exam will start and when it will end. Our educators enter these values. Again, our students are given the opportunity to take the exam in accordance with the exam measurement and evaluation steps.

3.4. Total Examination Right
It defines the examination right in order to prevent you from being victimized. In other words, if you experience a problem during the exam, it gives you the right to start the exam from the beginning again. You do not have to use all your exam rights. If you have completed your exam without any problems, you do not need to use your other rights.

3.5. Steps to Participate in the Online Exam
When you complete the steps below, you will successfully participate and complete your exam. For this, we recommend that you make sure that your internet connection is good beforehand and that you take the exam with the Google Chrome browser. If you have Chrome extensions, it would be better to disable them.
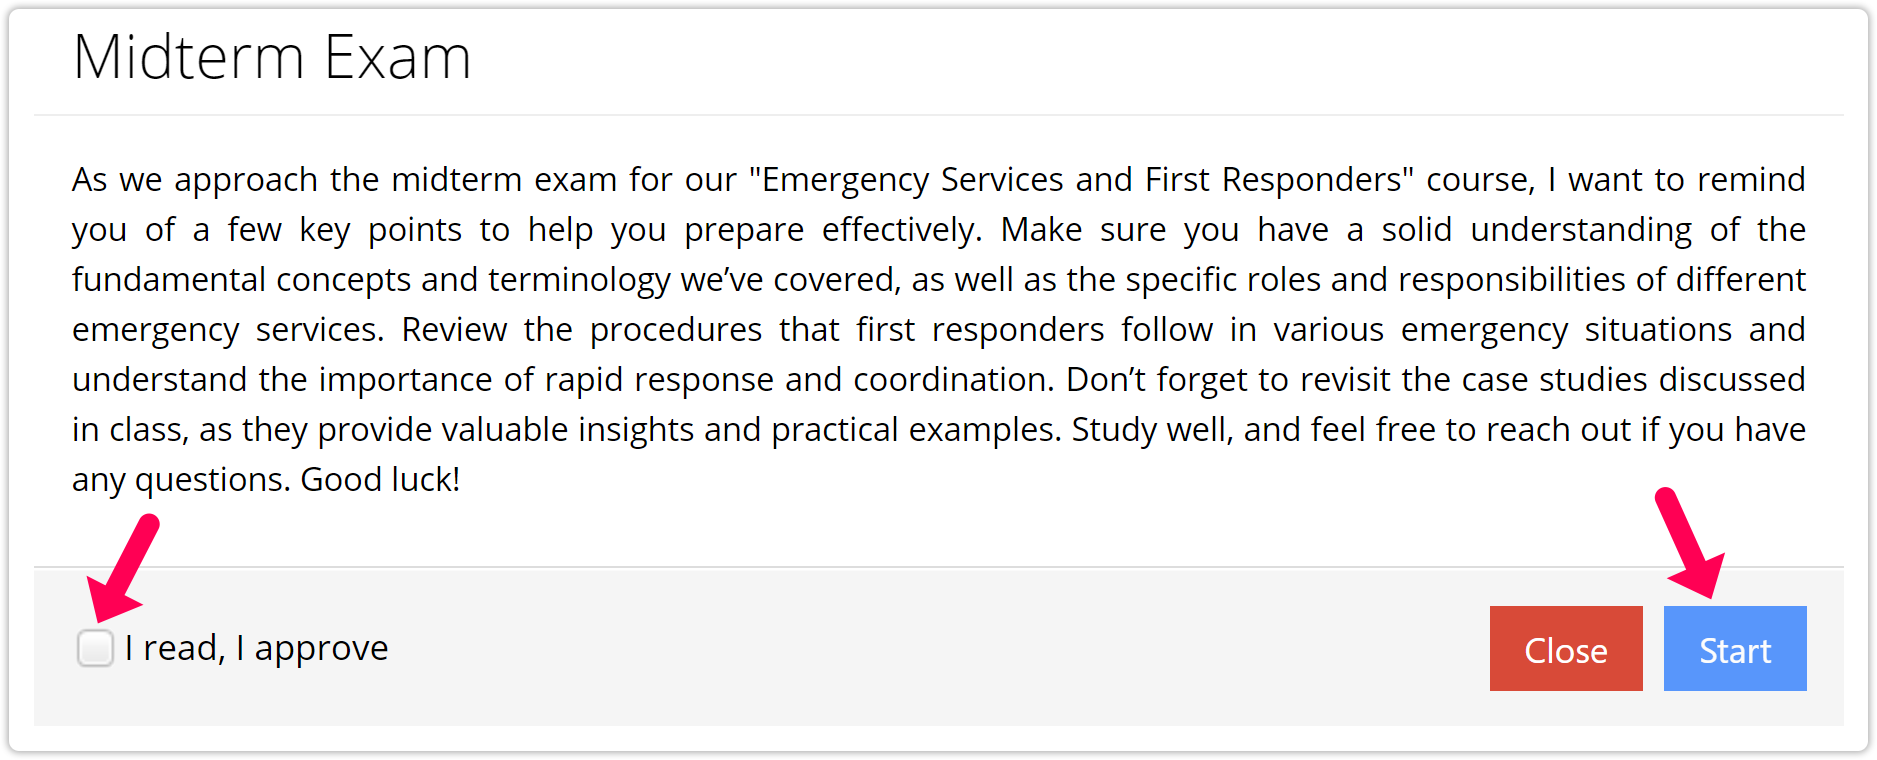
Step 1: Come to the relevant week of the exam. The View Exam button located at the bottom right of your exam activity will be green and active when the exam time comes. Click the button to enter the exam.
Step 2: When you confirm the I have read, I understand box in the exam window that opens and click the Start button, your exam will start.
Step 3: During the exam, you must select an option for each question and pass. Additionally, since there is no transition between questions, we recommend that you read and answer the question carefully.


Step 4: The exam time will be displayed on the right panel. This exam period is counted down. It is recommended that you take your exam by keeping track of your time.

Step 5: Below on the right panel is your Answer list. It means you have answered the questions with blue boxes. Questions with gray boxes mean they are not answered. As mentioned in the previous steps, there is no transition between questions. Answer carefully and move on to the next question.

Note: During the exam, you cannot navigate between questions. We recommend that you read each question carefully and answer it.
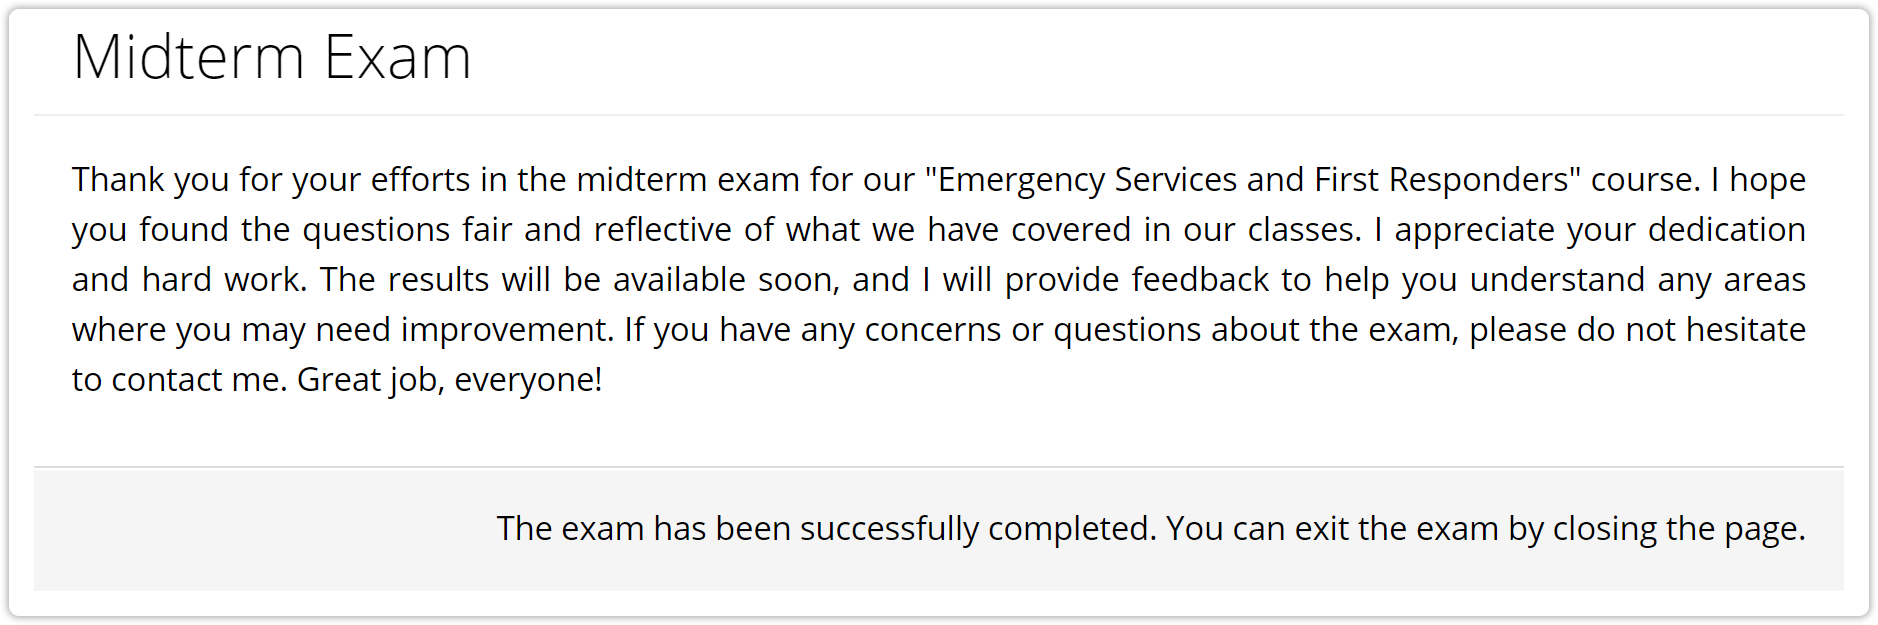
Step 6: When you answer all the questions in the exam, there will be an End Exam button next to the progress button on the last question. Click the button to finish your exam.

Step 7: You will then be asked to confirm that you have finished the exam with a small window. The Yes button should be clicked here too.

Step 8: Then the notification you see is "Your exam has been completed successfully." It will be in the form.
4. Asynchronous Video Monitoring
To watch the Asynchronous Video recording, you will see the video recording after coming to the relevant week. After pressing the Play button, the video will be played.

5. Watching the Re-Recording of the Live Lesson
In order to watch the course recording, the course must have taken place and finished. Lesson re-recordings are uploaded to the system approximately 15 minutes after the end of the lesson. When you press the Watch Replay button, the course recording opens in a new window.
