.png)
ALMS - Basic Instructor User Manual (English)
PDF of the Manual: ALMS - Basic Instructor User Manual.pdf
Examining this manual carefully will guide you in using the system.
I. DEFINITION OF LEARNING MANAGEMENT SYSTEM (LMS)
Consists of the initials of Learning Management System , which is Learning Management System in Turkish. In general terms, it can be defined as software that is created to manage e-learning processes more efficiently and effectively and enables the distance education model to be implemented on the internet.
1. With LMS ?
LMSs , as learning management systems, provide training management, reporting, performance tracking, automation, class - course creation, creating and uploading course materials, giving lessons and homework, creating exams, etc. It meets many needs such as. At the same time, LMSs allow integration with other tools to enhance the learning experience.
During the training period in Distance Education System (ALMS), instructors;
Creating and participating in a virtual classroom,
Access and control of live lecture recording videos,
Lesson - adding course materials,
Adding a homework area,
Creating exam or quiz activities,
Exam, quiz or homework grades to OIS (Student Information System),
Performance tracking,
Sharing announcements,
Student list checks for each branch,
Exchanging ideas with students, discussing scientific issues, etc. creating forums for activities,
Organizing a survey,
Sharing information notes,
etc. They can actively use many features.
1.1. ALMS (Distance Education System) System Requirements
ALMS Distance Education System is a cloud-based software and does not require installation. You can access the system via your browser (Google Chrome, Firefox, Microsoft Edge , Safari, etc.) using any computer, tablet or phone.
Note: Although all browsers can be used to access the ALMS system, it is recommended to use the Google Chrome browser.
1.2. The ALMS (Distance Education System) System?
Your Alms system from 2 different web addresses;
ALMS Domain: yourname.almscloud.com
Your Website's Subdomain: alms.yourname.edu.tr
II. INTRODUCTION TO ALMS (DISTANCE EDUCATION SYSTEM) SYSTEM
ALMS Distance Education System;
Log in to either yourname.almscloud.com or alms.yourname.edu.tr .
Username: In the username field on the page that opens, enter your OIS username without the combination of name and surname and Turkish characters. Ex: lukasschmidt
Password: You can log in to the system by entering your OIS (Student Information System) password in the password field and clicking the Start Learning button.

If you think you entered your username incorrectly, you can return to the previous screen and re-enter your username by clicking the up arrow button opposite your name on the login screen.
Note: The Distance Education Center does not create a password to log into the ALMS system. Since OIS (Student Information System) and ALMS (Distance Education System) user logins are integrated with each other, you can log in to the system using your OIS password. If you do not remember your OIS password, you can learn your password by contacting the Student Affairs Unit, which is responsible for the system.
III. ALMS DISTANCE EDUCATION SYSTEM MENUS
1. Main monitor
When you log in to the Alms Distance Education System, you will see a default standard welcome screen on the Main Screen (Home Page).
Fields in the top menu;

1.1. Home Page
The area where the welcome screen and menus are located.
1.2. My Courses
The area where your defined courses are listed. You can view active courses for the relevant period in the My Courses section, as well as list passive courses from previous periods. To view all the courses, click the Go to My Courses button.

The Go to My Courses button to view passive courses from previous periods . When you click on the Inactive option from the Course Status tab on the page that opens, the old term courses will appear. You can check your past courses by clicking on the semester.

After selecting the passive option, past periods will be listed at the bottom of the page. By clicking on the semester you want to check, you can access your defined course or courses, if any.

1.3. Reports
The area where you can access statistical information about the course.

From the activity reports, you can look at the participation rates of the course, branch or any user in the activities added to the course.

1.4. My Files
In the files tab in the course, only files added to the activities of the relevant course are listed. files; You can sort by different criteria by clicking on file name, activity, week, upload date, file type, file size and related item buttons.

You can view all the files instructors have added to course activities. You can download the file to your computer by clicking on the name of the course file.

1.5. Calendar
By selecting the year, month and day in the calendar, you can view the activities planned on the date you choose. In the activity type section at the bottom left, you can select the activity you want to view on the calendar by deselecting or selecting virtual class, homework, exam, video, forum, e-course and document. You can view the calendar daily, weekly and monthly by clicking on the day, week and month buttons in the middle of the calendar. You can switch to the activity by clicking on the name of the activity you are viewing in the calendar. You can add any documents, assignments, exams, etc. to your course in the system. If you do not add any activities, the calendar section will appear empty.

1.6. Question Bank
When you click on the question bank button, you will see the question search screen for your previously added questions. After selecting one or more of the main course, course, semester, exam, question text, keyword, subject title, category, question type, difficulty level, update date or creation date criteria, you can view any questions you have added before by clicking the search button. For more search criteria, click the detailed search button.
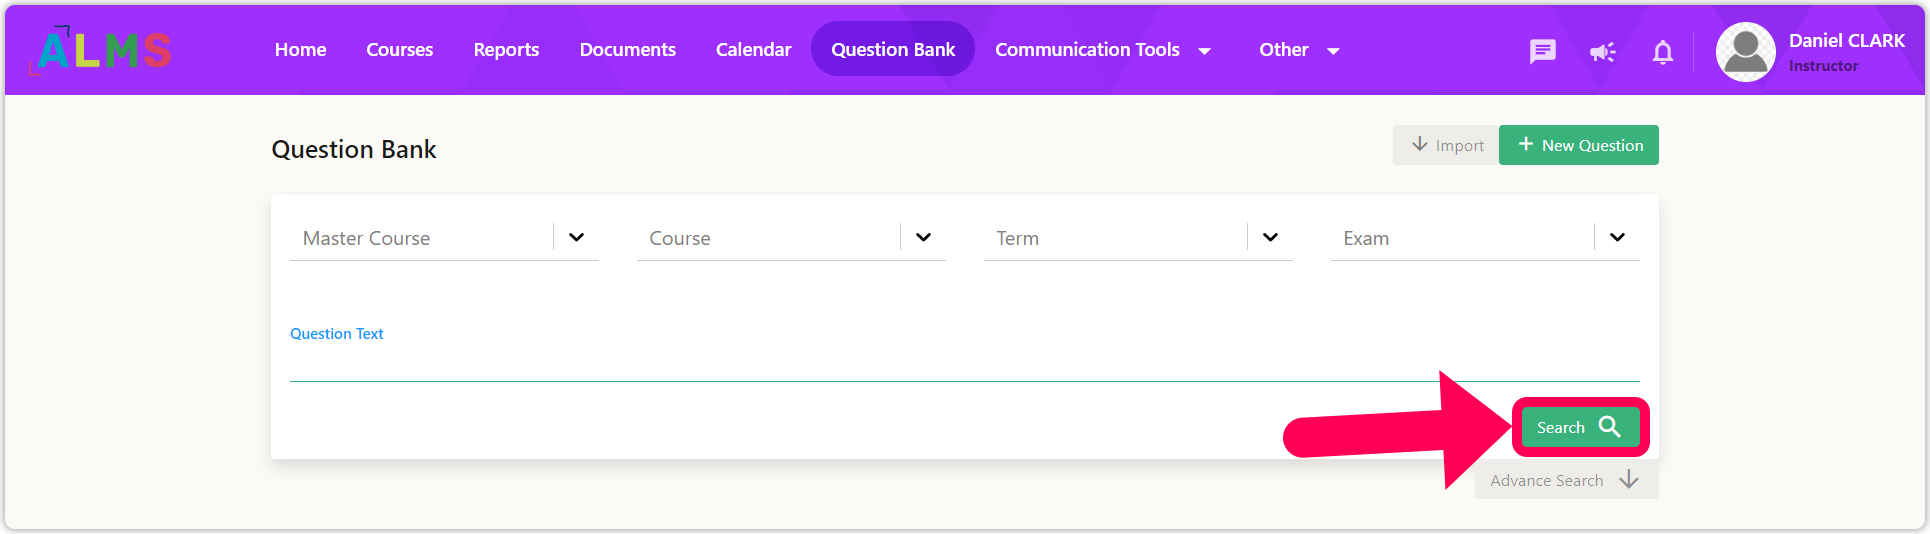
After the search, the questions are listed. Question text in the list; The question's ease, subject, and question type are displayed.
Note: If you have not used the listed questions in any exam in the system before, you can make changes to the questions. If a question has been used in any exam, it cannot be changed or deleted.
If you have not used the listed questions in an exam before, you can delete one or more questions by selecting them. You can edit the question by clicking the edit pencil button to the right of the question. The questions used in the exam cannot be edited. You can list the next 10 or previous 10 questions with the forward and back buttons at the bottom of the page.

The question editing page is the same as the question adding page. You can add a new question by clicking the new question button at the top right of the page.

The new question tab contains general fields for each question type. The more information you add when adding a new question, the easier it will be to add your question to the exam. Select main course, course, semester, subject title, category, keyword, difficulty level, question type. After selecting the question type, new fields appear according to the question type you selected.
1.6.1. Multiple Answer Single Choice Question Type
When you choose the multiple-single choice question type; You can add optional preliminary information text.
Upload your optional question file from the "Select your question file here" section.
Add question text to the question text section.
Add text answers by selecting text in the answer type section, or add photo answers by selecting a photo.
Type your answer option in the Write your answer option section. You can type formatted text or formulas.
Add new answer options by clicking the add new answer button.
Choose the correct answer by clicking on the selection to the left of the answer texts.
You can sort the answers by pressing and holding the left mouse button on the quadruple arrow button located to the right of the answer texts.
You can delete the answer text by clicking the cross button to the right of the answer texts.
If you want to add a new question after adding all the question and answer texts, you can save the question and add a new question by clicking the save and create new button.
If you do not want to add another question after adding all the question and answer texts, save the question by clicking the save button and return to the question bank page.

1.6.2. Multiple Choice Question Type
When you choose the multiple-choice question type, you can add optional preliminary information text.
Upload your optional question file from the "Select your question file here" section.
Add question text to the question text section.
Add text answers by selecting text in the answer type section, or add photo answers by selecting a photo.
Type your answer option in the Write your answer option section. You can type formatted text or formulas.
Add new answer options by clicking the add new answer button.
Choose the correct answers by clicking on the selection to the left of the answer texts.
You can sort the answers by pressing and holding the left mouse button on the quadruple arrow button located to the right of the answer texts.
You can delete the answer text by clicking the cross button to the right of the answer texts.
If you want to add a new question after adding all the question and answer texts, you can save the question and add a new question by clicking the save and create new button.
If you do not want to add another question after adding all the question and answer texts, save the question by clicking the save button and return to the question bank page.

1.6.3. Open-Ended Question Type
When you choose the open-ended question type, you can add optional preliminary information text.
Upload your optional question file from the "Select your question file here" section.
Add question text to the question text section.
If you want to add a new question after adding the question, you can save the question and add a new question by clicking the save and create new button.
If you do not want to add another question after adding the question, click the save button to save the question and return to the question bank page.

1.6.4. Sorting Question Type
When you select the ranking question type, you can add optional preliminary information text.
Upload your optional question file from the "Select your question file here" section.
Add question text to the question text section.
Add text answers by selecting text in the answer type section, or add photo answers by selecting a photo.
Type your answer option in the Write your answer option section. You can type formatted text or formulas.
Add new answer options by clicking the add new answer button.
Sort through the answers by pressing and holding the left mouse button on the quadruple arrow button located to the right of the answer texts. Add or edit the sorting question answers in the correct order.
You can delete the answer text by clicking the cross button to the right of the answer texts.
If you want to add a new question after adding all the question and answer texts, you can save the question and add a new question by clicking the save and create new button.
If you do not want to add another question after adding all the question and answer texts, save the question by clicking the save button and return to the question bank page.

1.6.5. Matching Question Type
When you select the matching question type, you can add optional preliminary information text.
Upload your optional question file from the "Select your question file here" section.
Add question text to the question text section.
Add text answers by selecting text in the answer type section, or add photo answers by selecting a photo.
For matching answer texts, type an answer option in the "Write your answer option" section on the left. Write the pocket text that will match the text on the left in the "Write the answer option" section on the right. You can type formatted text or formulas.
Add new answer options by clicking the add new answer button.
You can delete the answer text by clicking the cross button to the right of the answer texts.
If you want to add a new question after adding all the question and answer texts, you can save the question and add a new question by clicking the save and create new button.
If you do not want to add another question after adding all the question and answer texts, save the question by clicking the save button and return to the question bank page.

2. Communication tools
2.1. Messages
When you click on the Messages communication tab, other students and teachers in your class are listed in the groups and people you are part of in the groups section on the right side of the page. You can search for a group or a contact and switch to the messaging area by clicking on the group or contact name. On the left of the page, in the all section, you view the latest messages received or sent by group and individual. You can view group messages by clicking on the group button and view personal messages by clicking on the personal button.


When you click on a group or person's name, the messaging section opens in the middle. You can view older messages by swiping up on opened messages. You can write a message by clicking on the section where it says enter message and send your message by clicking on the send button. You can add the format, thickness, italic, underline, strikethrough, quote, bullet, number, item, indent, formula and link features to the text you write. You can clear the formats of a text you added. You can add an emoji or a file to your conversation.

2.2. Announcements
You can read the announcements sent to you by clicking on the announcement names in the incoming announcements section.
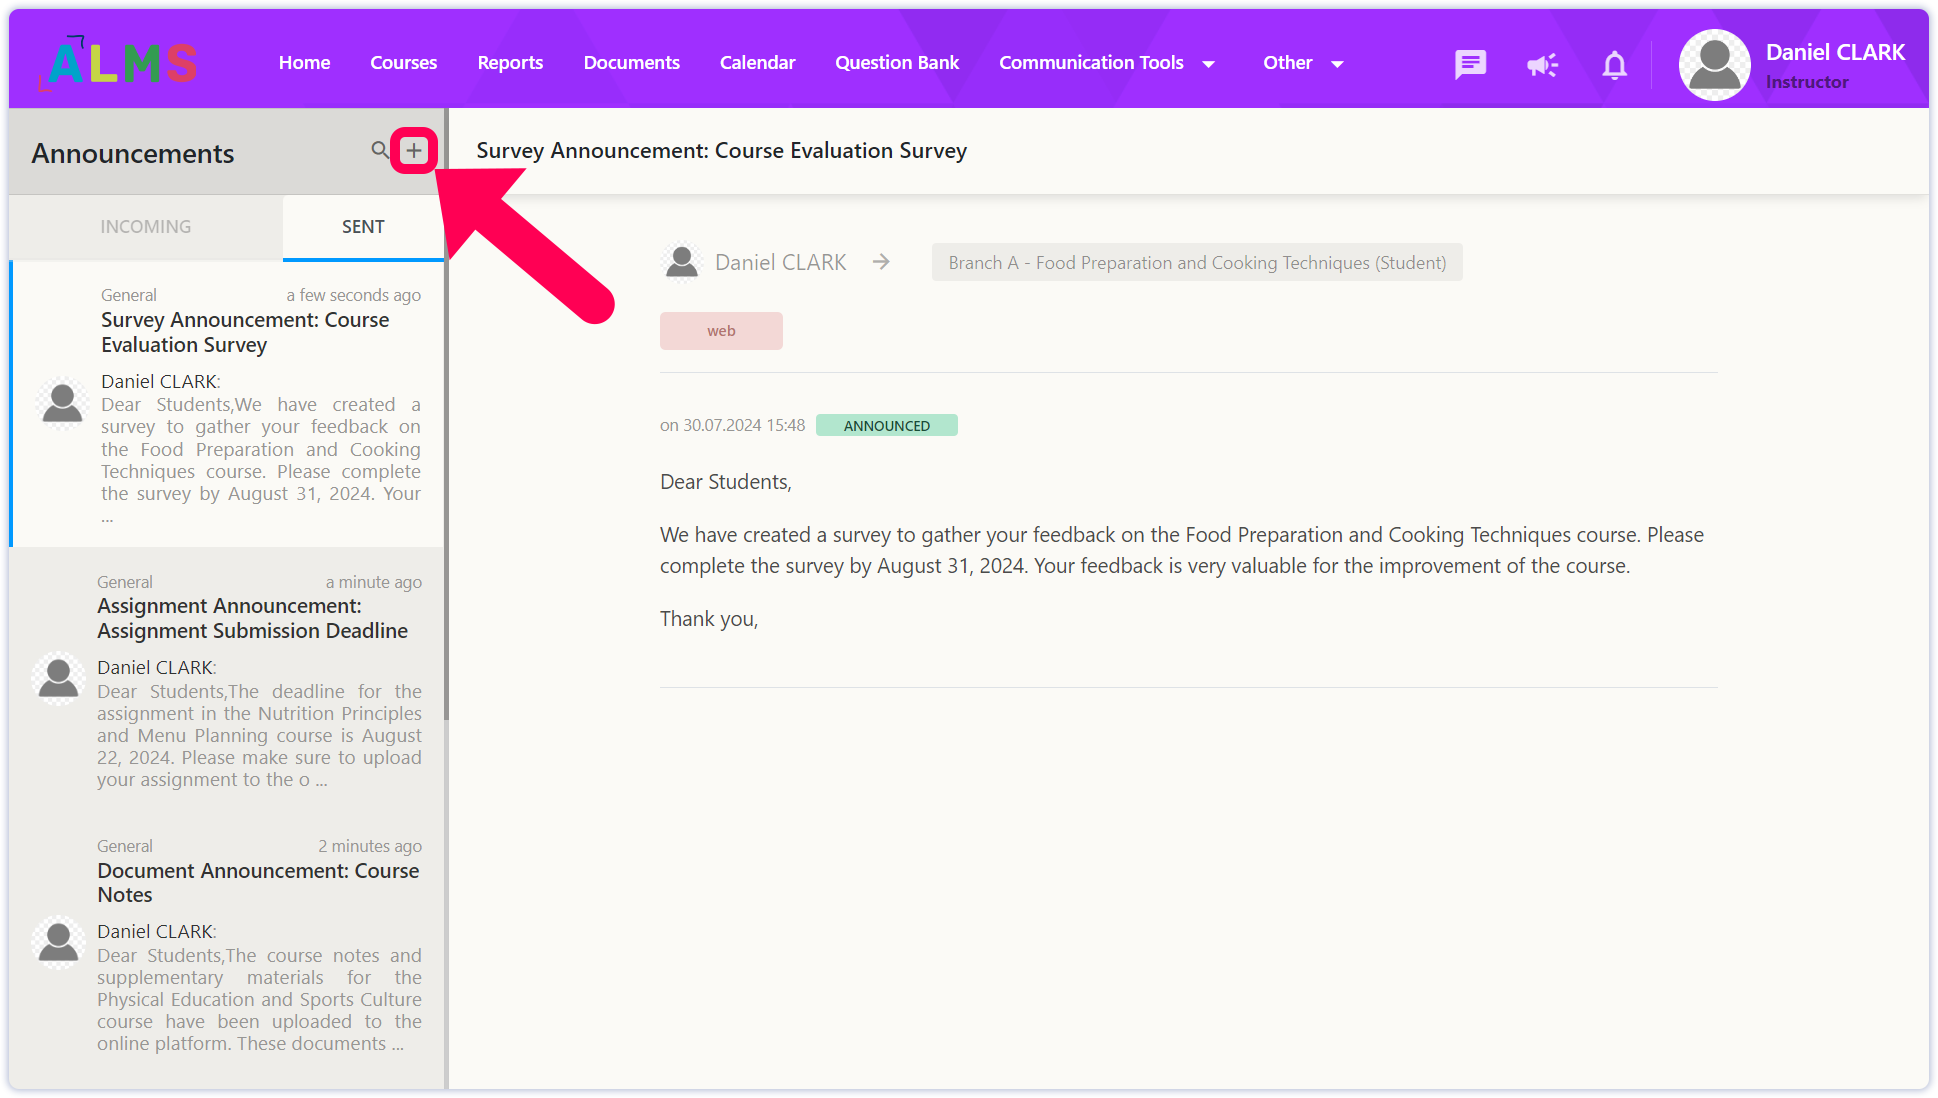
You can make a new announcement to your students by clicking the Write button on the left.

You can see the announcements made to all users from the inbox button, and when you click on the published button, you can see your live announcements.
You can see the announcements you have written and not published yet from the Draft button, and you can see the announcements you have removed and archived from the Archive button.
2.3. Forum
You can have scientific discussions with your students by opening a topic on any subject. After clicking the Forum button, you can open a topic by clicking the Open New Topic button on the page that opens.

2.4. Help
For your system-related questions, you can open a support request from the help area to the company from which we receive support for the Alms Distance Education System.
Note: For your help and support requests regarding the Alms Distance Education System, it is recommended that you contact the Distance Education Application and Research Center team.
IV. MY COURSES
Alms Distance Education System by logging in to either yourname.almscloud.com or alms. yourname.edu.tr . You can view your active course list on the home page screen or via the My Courses button at the top.
1. Sections in the My Courses Tab
After logging into the course, there are a number of buttons next to the course name.

1.1. The Course Content
The course content section is the most used area that covers all course activities. Virtual classroom, documents, homework, exams, information notes, etc. All activities are added from the Course Content tab.

1.2. The Announcements
The announcements section is the area where announcements can be made to all students or students in certain branches.

1.3. The Discussion
The discussion section is a forum-like area used to exchange ideas on any subject.

1.4. The Files
The files added to the activities of the relevant course are listed in the Files tab within the course. files; You can sort by different criteria by clicking on file name, activity, week, upload date, file type, file size and related item buttons.

1.5. Student List
Only students of the relevant course and relevant branch are listed in the student list tab within the course . You can list students in other branches by clicking on the drop-down branch menu at the top right of the course page and selecting other branches from the list that opens. In the student list; You can sort by different criteria by clicking on the name, surname , username, last login date and progress buttons.

1.6. The Transactions
You can view activity copying, activity duplication and grade sheet creation titles from the Transactions section. Only creating a grade sheet and copying or duplicating activities for the relevant course can be done.

V. CREATING AN ACTIVITY IN THE COURSE
Adding documents to the course, creating a virtual classroom, adding a homework area, exam area, etc. The process of adding fields is called creating an activity.
1. Adding Documents to the Course
You can add documents such as Office files (word , excel, ppt...), pdf documents, text documents to a course .
The steps to be followed to add documents of any type to the course are listed below.
Step 1. Click on the course to which a document (activity) will be added, either on the home page or from the My Courses tab.

Step 2. After clicking on the course to which the document will be added, click on the Course Content tab since all activities will be added to the selected course.

Step 3. When you enter the course content screen, click on the plus button opposite the Course Schedule.


Step 4. On the add activity page that opens, the Document activity is selected.

Step 5. The document activity adding window contains branch selection, content and settings tabs. If you want the added document to be visible for all branches on the page that opens, all branches are selected and the process continues.

If you want it to be visible only for certain branches, you should continue by selecting the branches you want to be visible from the Add Branch section.

Note: There is mutual integration between Istanbul Topkapi University Distance Education System (ALMS) and Student Information System (OIS). Any student or instructor added to OIS is also reflected in the ALMS system. However, the initiation and arrangement of these processes are carried out by the Distance Education Center team. When a new branch is added to the course, students in that branch cannot see the old activities. When a new branch is added to the course, it must be saved by selecting the Select all branches checkbox again from the branch selection in the editing section for all activities.
Step 6. Document settings to be added are made in the Content section. The name of the added document is written in the Activity name section. The description section is optional, you can write any notes about the document that you want students to see. Upload a file for the document activity from the Upload File section and click the Upload a File button.

In the Over time section, you can view your file by week or date.
Note: It is recommended to view the added file by week. Files published by a certain date cannot be viewed after the specified date.

If the activity completion criterion is View and Last Completion Date, it can be left blank and continue.
Step 7. You can always activate the pin to the top feature so that the Activity, which was added optionally in the last Settings section, is shown at the top in the week it is added. You can enable the download of the file you uploaded by activating the Allow download feature.
2. Creating a Virtual Class in the Course (Adding a Virtual Class Activity)
Online courses at Istanbul Topkapı University are delivered through the Perculus Plus application. There is integration between Distance Education System (ALMS) and Virtual Classroom Application (Perculus Plus). For courses that will be taught live, it is necessary to create a separate virtual class activity for each week for the relevant course within the Distance Education System (ALMS).
Adding a virtual classroom activity to the lesson The ways to follow are listed below.
Step 1. After logging in to the course to which the virtual classroom will be added, click on the plus (+) button on the top left of the course content page, to the right of the course schedule text.

Step 2. In the activity type, click the virtual classroom activity button.

Step 3. The virtual classroom activity adding window includes branch selection, content and settings tabs. In the add virtual classroom activity window, click on the select branch list on the select branch tab. Continue the process by selecting the specific branches or all branches you want to add to the live class.

Step 4. In the virtual classroom activity content tab, enter the activity name and optionally the activity description. Optionally, you can also attach files.

Step 5. The scheduling section by week. The week in which the live lesson will be held must be selected. In date-based visibility settings, live class visibility will be disabled when the relevant date passes, so it is not recommended.
The virtual classroom type should remain Perculus Plus, which appears on the screen by default.
Start time is the field where the date and time information for the course will start must be entered.
Activity duration shows how many minutes the lesson will last. Even if the lesson takes longer than expected, the lesson duration can be extended via Perculus Plus during the live lesson.
Activity preparation time is the time in which you enter the number of minutes before the class starts. During this period, the teacher enters the class and explains about sharing presentations, camera settings, etc. can perform preparation operations such as.
The Save session option must be approved for the course to be recorded. For courses that are not registered, asynchronous recording must be made again and the course registration must be added to the relevant week.
The activity completion criteria section, it is recommended that the completion status of the activity be selected as live and archive participation by default.
The Last Completion Date is left blank and you go to the last page by pressing the continue button.

Step 6. In the virtual classroom activity settings tab, you can optionally activate the always pin to top feature so that the activity is shown at the top during the week it is added. When you click save last time, a virtual classroom activity will be added to the relevant week of the course to enable you to have a live lesson.

When the date and time of the lesson arrives, you can enter the live lesson by clicking the Join button.
3. Adding an Assignment Area to the Course
After logging in to the relevant course page to which homework will be added, click on the plus button at the top right and click on the create homework activity button. The Create assignment activity window will open.

Then click on the homework activity button in the activity type.

The window for adding an assignment activity includes branch selection, content and settings tabs. The steps for adding assignments are listed below.

Step 1. In the add homework activity window, click on the select branch list on the select branch tab. Continue the process by selecting the specific branches or all branches you want to add to the live class.
Step 2. In the homework activity content tab, fill in the activity name and optional activity description fields.

Step 3. Add the file you want your students to use in the assignment.
Step 4. Enter the start and end date and time in the activity start date , that is, the date the assignment will start to be sent and the deadline section. In the Scheduling section, select the visibility of the new activity you will add by week (Week Selection), by date (Date Selection) and activity completion status (Activity and Time Selection). For the timing part, it must be added according to the week as stated in other activities. Activities added by date will not be visible to anyone other than the educator after the relevant date, which may cause problems in the future.
File Upload Right refers to the student's attempt to upload a single file. The number 3 seen in the example indicates that you have the right to try to send a file three times.
Note: Only 1 file can be added to the assignment area. If more than one file needs to be sent, the student must use a data compression program (e.g. zip file) to combine all files into a single file and send it that way. Considering the uploading time of assignment submissions, students should be reminded not to leave it until the last minute.
Maximum file sending size is limited to 1 GB.
That the Activity Unit Criteria remain viewing.

Step 5. In the Settings section of the last tab, the optional always pin to the top option ensures that the homework activity appears at the top in the relevant week.
The Create for students option is a field that can be used in assignments you create for any student. For example, it can be opened for a student who will participate in the make-up exam.
When the relevant field is activated, some options appear right below it.

The number appearing in the Atali students section indicates how many people saw the assignment. Click Edit to create an assignment area for specific students only. Then, select all students by checking the box shown below in the window that opens.

After selecting all students, remove all selected students from the activity.

After removing all students from the activity, go to the Removed students tab. Add the relevant students to the homework activity by searching for the student whose name, surname or student number you want to see the homework from the Removed Students tab, or by selecting from the listed students, pressing the Add Selected Students to Activity Button and saving.

Activity Prerequisite is an optional feature. The component that the student is asked to complete before the homework activity is selected here. In the example below, the prerequisite is specified by selecting the final exam of the relevant course before the student's homework activity.
Finally, when you click on the Save button, the homework activity is added.

An example screenshot of the homework activity is as follows. The student can upload a single file to the area by clicking "send assignment". In the example below, 5 upload attempts are given for a single file. Students are always advised of power outages, internet connection problems, technical malfunctions, etc. For these reasons, it is recommended to give more than one attempt.

4. Adding Information Notes to the Lesson
You can add an information note containing the information you want to the lesson. The purpose of this Information Note is to inform your students about the course, homework collection, exam, etc. It is included to make certain information such as visible in the system in writing. For example, students may be asked to research a short topic before attending the live class next week. Or, you can use this feature if you have to change the start time of the course, or if you want to inform your students about the exam date and the subject that needs to be studied in the exam.
After clicking on your relevant course, click on the plus button next to the course name.

Then click on the Information Note from the menus that appear.

The Information Note adding window contains branch selection, content and settings tabs. The steps for adding assignments are listed below.
Step 1. Information Note window, click on the Select a branch list on the Select a branch tab. Continue the process by selecting the specific branches or all branches you want to add to the live class.

Step 2. In the information note activity content tab, fill in the activity name and information note text fields.

Step 3. Then, if you wish, you can add a document of your choice from your computer to your information note by clicking the Select button from the file upload area. The document can be a jpeg, docx , pptx , pdf etc. It may also happen.

Step 4. In the Timing section, you can restrict the visibility of students by writing your information note by week or by giving a certain date range. After you are done, click the Continue button.

Step 5. In the settings section, you can activate the Always pin to top feature if you wish. In this way, it will be at the top of other activities. You can also specify activity prerequisites if you wish. After you are done, click the Save button.

Step 6. After the process, your information note will be shared as follows.

5. Lesson Making an Announcement Inside
There are two ways you can make the announcement.
The first is the section in the Announcements menu in the course. This announcement can be made for students taking the course.

Secondly, announcements can also be made from the Announcements section in the Communication tools in the main menus. You can also view incoming announcements and sent announcements in detail in this section. You can also view the announcements made by the Distance Education unit.

The steps for both processes are the same.
Step 1. You can create a new announcement by clicking the + button in the Announcements section.

Step 2. Then, specify the title of the Announcement in the window that opens.
The Content section. You can skip the branches you want in the Recipients section.
While all courses are visible in the announcements made from the main menu, only the branches taking that course are visible in the announcements made from the course content.
If there is an optional file to be added in the Upload File section, you can add it. The general settings section, there are settings that are up to the preference of our instructors.
After the relevant edits are made, click the Save button.

Step 3. Then you will be able to see your announcement in the system.

VI. CREATING AN EXAM
The steps to create an online exam are given below. When you follow the steps in order, the exam will be added without any problems.
Step 1: After arriving at the relevant course where you will take the exam, click on the Exam activity from the + button.


Step 2: During the branch selection phase, you can choose the branches where you want to apply the exam. If the exam will be applied to the entire branch, you can select the All branches box. Then click the Continue button.

Step 3: At the content stage, you must specify the exam name as the Activity name . You can make a relevant explanation about the exam in the description section. The pre-exam message section contains the message that the student will see before the exam starts. The post-exam message section contains the message that the student will see after completing the exam. It is up to your choice to leave it blank or provide information.

Step 4: Then we need to make adjustments for the exam duration, the number of exam questions and the number of exam repetitions. In the Exam duration section, enter the time you have determined appropriate for your exam. If the number of repetitions is in this section, it is the student's right to take the exam. It has been decided to grant at least 3 rights due to reasons arising from internet outage, system usage error or possible errors. In the number of questions section, you need to specify numerically how many questions you want to have in your exam. If you check the option "The student can use an unlimited number of repetitions", the number of repetitions section will be infinite.

Step 5: Select the dates and times specified in your own exam program in the "Date the exam will open" and "Date the exam will end" sections. If you select the "Can enter within the given time" option in the exam entry time section, your student can, for example, enter the exam between 13.00 and 15.00 at 14.59 and complete the exam during the exam period. If you select the "Exam will be completed when the given time expires" option, students will be expelled from the exam as of 15.00, even if they have not completed the 45-minute exam period and are still in the exam. It is evaluated based on the questions marked in the unfinished exam.
NOTE: Therefore, our instructors are recommended to tick the "can log in within the given time" option.

Step 6: In the date section where students can see their exam grades , you do not need to take any action if you want your students' exam grades to be seen immediately after they are read. Students automatically see the grades of the exam read in the system in their systems. If you do not want students to see their exam grades in the ALMS system until you enter the OIS system, you can choose a later date. In the scheduling section, if you want it to appear next week, the display by week option should be selected. This is the option that comes automatically.

If you want the student to see the exam activity on a certain date or not on a certain date, you should select the View by date option. It should be noted that in this case the activity is deleted from the students' screen.

If you want students to take the exam to take the exam after completing certain activities, you should select the View by Activity option.

Step 7: In the category section, Test is the current option. You don't need to change it. In the Exam grading type section, the currently available Highest-grade option must be selected.

Step 8: The question weighting type section is a feature you can use if you want students to receive a certain number of questions from each difficulty level or each topic from the questions you have added to your exam. If you are not going to use it, you can select None.

a. Adding questions based on topic title: If you are going to add questions based on topic title, select the Topic option. Then, there will be a space for you to write your topic title, where you can write your topic titles in order.

b. After writing the topic titles, the number of questions and score information will appear below. You can add as many subject headings as you want, or you can add more than two subject headings. You may or may not receive all the questions you added to the topics. As for the question scoring logic, you must write the score for 1 question in the relevant category numerically in the Score section. For example, the value of 1 question on the mysql topic is 10 points, while the value of 5 questions is 50 points in total. With this method, you can score the total score to 100.

Step 9:Then, the option below that suits your exam must be selected.
Shuffle questions option; It randomly presents students with questions from the pool .
Shuffle options option; It presents students with questions by mixing up their options.
Enable automatic recording option; This is the necessary adjustment for all students to take the exam. It should be selected.
After your transactions, click on the Continue button.

Step 10: Then, if you activate the Always pin to top option in the Settings section, students will see the first exam activity when they enter the course. If the activity prerequisite option is activated, students can complete the relevant activity beforehand and take the exam. This option is not preferred.
Then click the Save and View Sessions button.

Step 11: Then, the Exam Session settings page will open from the Session information, Add question, Exam Questions, Assigned students, Student assignment, Security and Publish menus.

a. session information menu, the date, time, session name, etc. of your exam. is located. If you are not going to create a student-specific exam, you do not need to take any action. You can switch to the other menu.
Note : If a student-specific exam will be created, the Enable Automatic Registration option should be disabled. Then the Save button should be pressed.

b. Add question menu. If you wish, you can easily choose your questions according to main course, keyword, and topic title.

Then select your questions by selecting all and click on the Add selected questions to the session button.

c. Then you will see your added questions in the Exam Questions menu.

d. If you are giving the exam to all your students in the Atali students menu, you do not need to take any action. You can proceed to the Publish menu.

However, if you are creating a personalized exam, at this stage you should select all students and remove them from the exam, then add the students who will take the exam to the exam by writing their student numbers. For example, let's say only Afra Nur Vatansever will take the exam.
First Step: You must select all students and click on the Log out selected students button.

Second Step: In the student assignment section, select the relevant student and click the Add selected students to the session button.
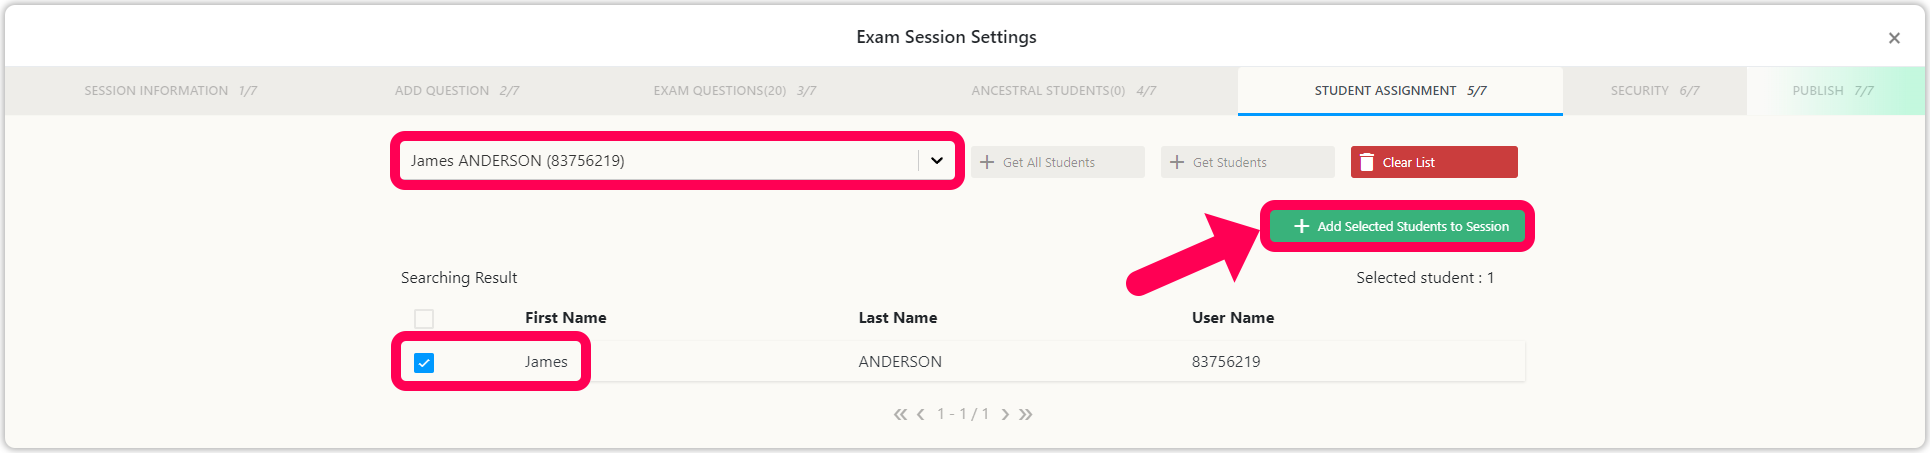
Third Step: Then the student will register for the exam. Only the students we want will be included in Atali students.

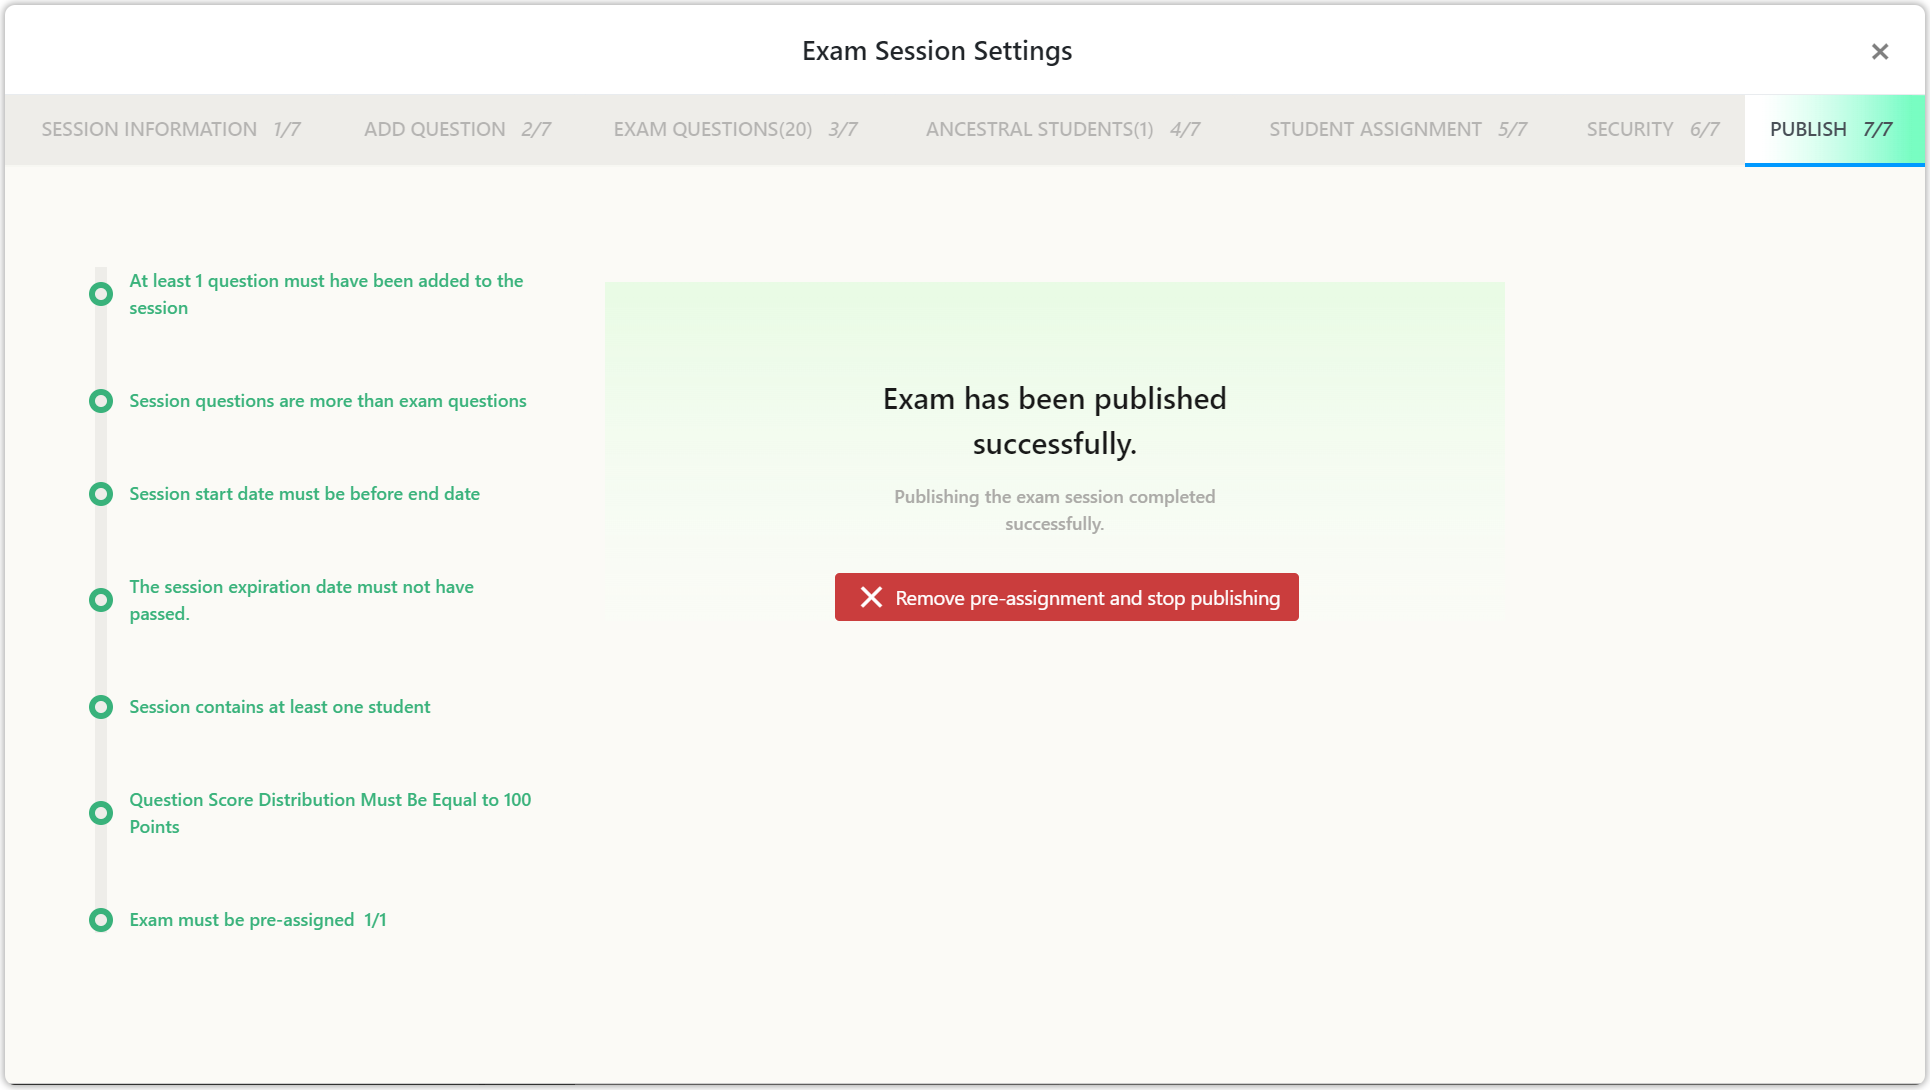
e. After adding questions to the exam and assigning students to the exam, you can publish your exam from the publish menu. In order for the exam to be published without any problems, all of the items on the left must be error-free in green. Then click on the Pre-assign and publish button in the middle of the page.

Then your exam will be published.